
Oster Blender Blade Stuck? Well, once in a while, you might have been upset by a stuck blender blade, but this is a common phenomenon, especially when it overworks or runs on insufficient ingredients.
However, there is more to that. While the above reasons can cause the problem, other factors can make it stuck. Stuck blades can be harmful, especially if you try to work on them with bare hands.
There is a way to solve the mystery safely and without harm or damage. In this article, we shall have an in-depth look and review of this challenge.
I shall mention the causes of stuck blades and how to avoid the challenge. To understand more, please go through the article in its entirety.
Do not hesitate to share it with your friends ff you find it useful. Leave your remarks, compliments, criticism, and so on in the comment section below.
Why Is my Oster Blender Blade Stuck?

- Powerful 1400W motor
- 64-Ounce BPA-free Tritan jar
- Three programmed settings (smoothies, dips/spreads and Soup)...
- Stainless steel blade spins at over 250 mph thoroughly...
Many things can make the Oster Blender Blade Stuck. These factors include food debris, dirty parts, air bubbles, and moisture.
If the food debris gets stuck between the blender base and the blade assembly, it can make them get stuck. Large pieces of food between the blades can hinder total movement and make it stuck.
Moisture can also make the Oster blender blade not spinning. You might be wondering how it leads to that. It makes the steel parts rust.
That is because the blade assembly of the Oster blender is not well arranged and won’t move. Always ensure that you store your equipment dry to avoid rust because it is dangerous.
Big air bubbles in the blender base can make the blades stuck. It is commonly known as cavitation. When it is big, it can stop the blender blades from moving.
It happens mostly when you do not maintain a good balance between the frozen fruit and the liquid ingredients in the combination. Whenever it happens, use the “Pulse” mode to dislodge.
In addition, the blender blade can also get stuck when the equipment overworks. Sometimes, it becomes necessary to carry out the Oster blender troubleshooting to get out of this problem.
An electrical problem is another factor that can make the Oster Blender Blade Stuck. It could be due to poor power connections, loose connections in the system, or a total lack of electricity due to blackouts.
However, this is a temporary problem and can be solved by repairing the faulty parts or by restoring power. If you do not lubricate the blade assembly, it can cause it not to move.
Furthermore, overfilling the jar and pressing the power button will not make the blades rotate. It might become necessary to remove some ingredients before starting the blender again.
Finally, improper fitting of the blender blade and the base can also cause the blades to get stuck. The blender might not even start due to improper connection in the system.
Recommended Best Oster Blender Blade


How Can I fix A Stuck Oster Blender Blade?
When you run into problems with your Oster blender, chances are that it needs a replacement, or fixing. Kitchen appliances face numerous tasks because they are in constant use and probably might need frequent servicing.
Furthermore, it might be necessary to replace the blender if it becomes out of service. We will look at some of the solutions to the problems highlighted above.
Step 1.
First of all, you need to confirm that the blades are stuck using both manual and mechanical means. You need to carry out the blend troubleshooting to ascertain the extent of the problem.
Manual means require using fingers to ascertain the blades are moving and the blender blends. Mechanical, on the other hand, involves plugging it into power to find out the problem with blade movement.
From that point, you will be able to ascertain the procedures to undertake, and whether they will yield a positive or a negative outcome.
Step 2.
Disassemble the blender blade assembly. If you confirm that the blades are frozen, remove them from the blender body. Observe personal safety since the blade assembly can hurt if not handled properly.
Step 3.
Look for a small deep pot that can accommodate the blades. Do not place them on the floor because of safety and hygiene concerns.
The pot should be clean and be able to hold water that can immerse the blade assembly.
Step 4.
Get a clean, dry dish towel, cotton towel, or a paper towel that can free the blade assembly of any liquid. You will use it to absolve the blender of any moisture. It should be able to absorb the liquid.
Step 5.
Get a spoon or a tong. Most blenders come with a tong and a pair of heat-resistant gloves. The gloves will serve the purpose efficiently by taking care of your hands while working on them.
Step 6.
Get enough water in preparation for pouring it into the pot. The water, once in the pot, should fully cover the blade. In addition, get a cup of liquid soap to make it soapy water. That will remove any stains and other food particles. Do not add excess soap, but just the required amount.
Step 7.
Pour enough water into the pot. It should be enough to cover both the blade and the blade disc. None should be visible. You might need to use the tong to keep the blades under the water while on fire.
Step 8.
Put the pot on the fire and turn it on. Leave it until it gets to the boiling point. Once it reaches that point, begin reducing the heat while opening the pot.
Use the spoon or a tong to gently pick and drop the blade into the boiling water. Ensure that the blades face upwards, and the disc faces downwards.
If they are not fully immersed, press it down gently with the spoon. Avoid water splashing you. Check at intervals to ensure that it is below the water.
Continue boiling the blade assembly for between 3 to 5 minutes. After the intense boiling, turn off the stove.
Step 9.
Add a little liquid soap to the pot and cover it. Leave the contents of the pot to sit for about 4 minutes in hot water. The soap will remove all traces of grease and other stubborn oils.
Take it out of the water using the spoon or a tong and transfer it into cold water. When it cools down, clean it with a paper towel, a dish towel, or a soft cloth, depending on what is available.
Step 10.
Wipe off all the water. Traces of water will make the blade assembly rust and get stuck again. Clean all the other parts of the blender before putting it back again.
Assemble the blender and test it to see if it is operational. Oster Blender blade stuck, and the entire set is dishwasher safe.
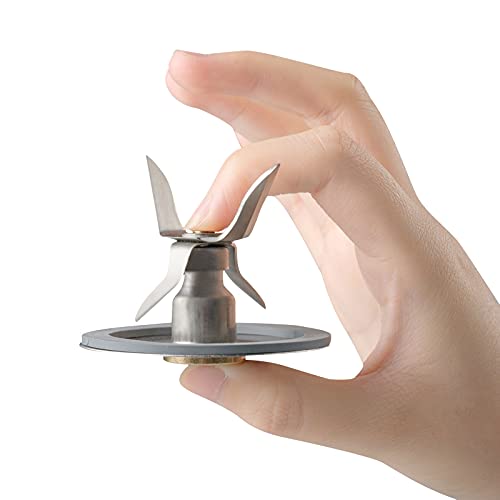
How Do You Take Apart an Oster Blender Blade?
How do I disassemble Oster my blend blade assembly? Well, the procedure is quite simple. You will first require to disconnect the equipment from the source of power.
Secondly, make sure that there is nothing in the blender jar. You cannot dismember it if it has ingredients in place.
Remove the blender jar from the base. Notice that the blade assembly is usually beneath the blender jar. Be careful not to break anything as the pitcher might contain some delicate connections.
Turn the jar upside down, and rotate the cup in the anticlockwise direction, from right to left. When through with this, you will access the blade assembly and the rubber bank protecting the end of the pitcher.
Remove both of them carefully and clean your equipment. You can replace the faulty parts at this point. Always go through the manufacturer’s manual before attempting to take apart the blender blade.
The manual can handle the technical parts that the blender comes with. Failure to adhere to the guidelines can lead to forfeiture of the warranty and damages to the blade assembly.
Finally, put back correctly all the parts as they were, before opening the blender. Test your blender to make sure that it functions well after dismembering.
When Should I Replace My Oster Blender Blades?
It is important to know when to replace your Oster blender blades. If you are noticing that your smoothies are not coming out as smooth as they used to, or if your blender is taking longer than usual to blend your ingredients, it might be time for a blade replacement.
It is also important to note that over time the blades will gradually wear down, so it is best to replace them every 6-12 months depending on how often you use your blender.
Furthermore, there are a few telltale signs that it might be time to replace your Oster blender blades. If your blender is having difficulty blending food or if the blades seem to be wobbling, it might be time for a new set of blades.
Additionally, if you notice that your blender isn’t performing as well as it used to or if the motor is making an unusual noise, it’s probably time for a blade replacement.
How To Replace Oster Blender Blades?

- Blending Blade With Sealing Ring
- Refresh and Revive, Add Years to the Life of Your Oster...
- Keep Your Oster Blender Functioning as Flawlessly as the Day...
- 2 Piece Blender Accessory Includes: 1 Blade & 1 Sealing Ring
The first thing is to look for a replacement before opening the blender. Most sellers offer the blade assembly replacement for approximately $8. You should first know how to assemble an Oster blender.
When you are set, turn off the power source from the socket and unplug the blender. Turn the unit upside down, but you will separate the jar from the blender body.
Twist the cup anticlockwise to remove it from the base. It will give you access to the blades. Squeeze the motor base of the clips to remove the panel clips. These are wires contacting the panel via the clips.
Remove the screws from the panels. Unscrew them using the correct screwdriver head. Lift the panel gently to avoid tampering with other circuits.
If your blender has the second panel, you will need to remove it before proceeding. Otherwise, the work will be complete and ready to replace.
Open the pack of the new blade assembly and put it into the cup. Replace everything in the correct order of all the parts that you had removed.
Place the cup on the base of the blender jar and rotate it in a clockwise direction. Connect it to the blender base and test your product. Ensure that it functions well before storing..
You May Like
How Do You Clean An Oster Blender Blade?
To clean my Oster blender blade, you need a cup or two of hot tap water. Again, soapy water and vinegar or baking soda would be necessary.
The procedure is as follows: add two cups of hot tap water to the blender jar. Then add the dishwashing liquid or soapy water. Add the required amount of vinegar or baking soda.
Connect it to the base and the socket. Hit the “High” button or any other that will rotate the blades. Let it clean for about 5 minutes before turning it off.
Press the power off button and disconnect the jar from the blender base. Empty everything, and repeat the process if it seems like the blade is not yet clean.
Add some clean, warm water to the jar and rinse it until the soapy smell is gone. Finally, wipe the blade dry, and either store or prepare it for the next meal. Another alternative is to wash it by hand.
You will need a scrubber, warm water, soap, and vinegar or baking soda. Begin by mixing ingredients in the jar, and use the scrubber to scrub off the dirt from the blade. Empty it and rinse with clean water. Wipe it dry in readiness for the next course of action.
Can Stuck Blades Damage A Blender?
The blades in a blender are what do the chopping and blending. If they get stuck, it can be difficult to free them and even more difficult to operate the blender. Can stuck blades damage a blender?
There is no definitive answer to this question. It depends on a number of factors, including the make and model of the blender, how long the blades are stuck, and how powerful the blender is.
In general, though, if the blades are stuck for an extended period of time or if too much pressure is applied, there is a chance that they could damage the motor or other internal parts of the blender.
Additionally, When you’re blending, it’s important that the blades are moving freely. If they get stuck, the blender can work too hard and overheat. This can cause damage to the blender and even start a fire.
So, if your blades get stuck, stop using the blender and unplug it. Wait for it to cool down, then try to free the blades.
Finally, If you are worried that your blades might be stuck, it is best to unplug the blender and wait for it to cool down before trying to free them. If they still won’t budge, take the blender to a professional repairman.
Frequently Asked Questions (FAQs)
FAQs are a great way to quickly familiarize with a product or service. Here are some of the most frequently asked questions for you no doubt.
How Often Should You Replace Your Oster Blender Blade?
The intensity of use will determine how fast or long it will take to replace the blender blade. While it can last for up to 6 months, in other instances, it can be less or more than that.
Much depends on how you use it and how the food processor blade is stuck. If it is less busy, it can take more than a year to replace.
On the other hand, if you use it frequently, you might need to change it before six months are over. Generally, it is recommended that you do a replacement once every 6 months.
Can You Sharpen an Oster Blender Blades?
Can you sharpen blender blades? You could be wondering if this can happen, but the truth is that you can sharpen blender blades. Oster blades are metallic, and therefore you can do so.
It is an easy task to undertake, provided you have the right tools and skills or methods. There are professional sharpeners that can handle the task with ease.
If you need some help, you might need to find them within your locality. Oster blades are sharp, and hence you need to exercise caution while sharpening to avoid harming your hands.
How Long Does Oster Blender Blade Last?
Oster food processor blades were built to last. However, it mostly depends on how you handle them. If you protect it from getting stuck or do not overload it, they can serve you for long.
I have personally bought these blades, and the most recent one was about ten years ago. These things do last, and more so, they are interchangeable. So, you do not have to worry about running out of replacements.
Are Oster Blender Blades Interchangeable?
Yes, you can interchange the blades. The Oster blender’s Alterna jar and the blade are interchangeable parts. They can work with the most high-end blender models and also in the kitchen. The blades are multipurpose and can work with compatible models.
When you want to buy replacement parts, first of all, make sure that they are compatible. Blender models are not similar, and you may end up with the wrong blade assembly for the correct blender model!
What Should I Do If My Oster Blender Blade Is Stuck?
The first step is to avoid using the blender because it can get damaged. Disassemble it and try to find out the cause of the sudden stoppage. It could be due to dirt, food debris, air bubbles, and rust from the moisture.
The next step is to deal with the specific cause to clear the mess. Assuming that it is food debris, you might need to boil water and clean the blade assembly. It will remove the dirt, and your blender will be ready for use again!
Does Ice Sharpen Blender Blades?
No. Ice cubes do not sharpen the blender blades. The truth is that ice is solid and harms the blades rather than sharpening them. Probably, they even cause it to stuck or even break.
In some instances, ice makes the blade bend or even blunt, that is if they do not break. Always blend a little of it while monitoring the behavior of the blender.
You can also know if something is wrong with the sound that it produces while at work. It is recommended to sharpen the blades once in a while after using them to blend ice.
Conclusion
In conclusion, it is a common phenomenon to have the Oster blender blade stuck. However, there is always a rescue way out of the situation.
The problem can occur due to factors like air bubbles, food debris, moisture, mismatch of the blade assembly and the jar, and so on.
Whenever this happens, stop the blender and work to resolve the problem. Avoid storing the blender while wet as it can rust and stop blades from working.
Finally, feel free to share this article with your friends and family if you find it useful. Feel free to share your thoughts, suggestions, and compliments in the comments section below.